
In This Article
Summer has a way of turning your patio into a place you avoid rather than a place you love. That’s the whole appeal of a DIY patio misting system: a network of thin tubing and tiny nozzles that turns your garden hose into a personal cooling cloud, usually for less than the cost of a nice dinner out. Instead of hiring a contractor to run copper lines through your pergola, you buy a kit, cut some tubing to length, and connect it to your spigot on a Saturday afternoon. Based on the spec comparisons across the seven kits below, the difference between a system that disappoints and one that transforms your backyard almost always comes down to nozzle material, water pressure, and how honestly the manufacturer describes coverage. A handful of clogged plastic nozzles can turn a $30 kit into a $30 lesson, while a well-matched brass or stainless system can make July bearable for a decade. This guide walks through seven real products on the market right now, explains what their specs actually mean for your patio, and gives you a practical framework for choosing (and installing) the right one without any guesswork.
Quick Comparison Table: DIY Patio Misting Systems at a Glance
| System | Line Length | Nozzle Count/Type | Pressure Type | Best For |
|---|---|---|---|---|
| mistcooling Patio Misting Kit Assembly | 24 ft | 4 brass/stainless | Standard hose (40-80 PSI) | Small patios & first-time DIYers |
| HOMENOTE Misting Cooling System | 26 ft | 7 brass | Standard hose | Budget buyers wanting a proven bestseller |
| GMAULEE Misting Cooling System | 33 ft | 10 brass | Standard hose | Mid-size patios on a tight budget |
| MIXC Misters for Outside Patio | 75 ft | 23 brass | Standard hose | Large yards & wraparound layouts |
| Mid Pressure Misting Kit (250 PSI) | Custom-cut | 10 stainless/brass | 250 PSI pump | Buyers who want restaurant-style fine mist without the premium price |
| Patio Misters Pro (1000 PSI) | 100 ft | 50 stainless steel | 1000 PSI pump | Large or covered patios needing dry, ultra-fine mist |
| Smart Mist App-Controlled (1000 PSI) | 70 ft | 35 stainless | 1000 PSI pump, app control | Tech-forward buyers who want scheduling and remote control |
Looking at the table, a clear pattern emerges: standard hose-pressure kits (40-80 PSI) dominate the budget and mid-range tiers, while anything promising true “dry mist” leans on a dedicated high-pressure pump instead. The jump from a 7-nozzle kit to a 50-nozzle kit isn’t just about coverage — it’s a jump in installation complexity, since more nozzles demand either more water volume or a pump to keep pressure consistent across the whole line. If your patio is under 300 square feet and you’re not chasing that ultra-fine restaurant mist, the standard-pressure kits deliver nearly all the cooling benefit at a fraction of the cost and hassle.
💬 Already have a favorite on this list? Check today’s price and availability before the summer rush hits!😊
Top 7 DIY Patio Misting Systems: Expert Analysis
1. mistcooling Patio Misting Kit Assembly — truest DIY build-your-own design
Unlike pre-assembled competitors, this kit hands you raw components and a short list of instructions, which is exactly the point for anyone who actually wants to design their own layout rather than follow someone else’s. The 24 feet of tubing splits into a 9-foot mist line and a 15-foot supply line, with four brass and stainless-steel nozzles that resist the pitting cheap plastic tips develop within a season.
On paper this means you’re buying flexibility rather than raw coverage — four nozzles won’t blanket a large deck, but they’re plenty for a small seating nook, a grill station, or a reading corner under an umbrella. What most buyers overlook about this model is that the compression fittings, not the nozzles, are usually the weak point; hand-tightening firmly (not with pliers, which can crack the fitting) solves the vast majority of reported leaks.
Reviewers consistently note that assembly takes closer to fifteen minutes than the promised five, mostly because first-timers second-guess the push-fit connectors, but almost everyone reports the same “why didn’t I do this years ago” reaction once the mist starts running.
Pros:
- ✅ Genuine build-your-own layout, not a fixed pre-cut line
- ✅ Brass and stainless nozzles resist pitting better than plastic
- ✅ Small footprint makes it ideal for balconies and reading nooks
Cons:
- ❌ Only 4 nozzles, insufficient for anything beyond a small zone
- ❌ Push-to-connect fittings need firm, careful hand-tightening
Priced in the $25-$35 range at the time of research, the mistcooling kit is less a “starter system” and more a “precision tool” for people who already know exactly where they want mist and nowhere else — check current pricing before you buy, since availability shifts seasonally.
2. HOMENOTE Misting Cooling System — most trusted budget bestseller
The HOMENOTE line consistently shows up at the top of Amazon’s misting category, and the spec sheet explains why: 26 feet of UV-resistant tubing paired with 7 brass nozzles and a 3/4-inch brass adapter that fits nearly every outdoor spigot without extra hardware. Based on the spec comparison against pricier options, HOMENOTE’s brass-only nozzle construction is the real story here — plenty of similarly priced competitors mix in plastic components that degrade under UV exposure within a single season, while brass simply holds up.
What the spec sheet won’t tell you, but reviewers note, is that the pre-assembled nozzle spacing (roughly every 3 feet) works well for umbrella perimeters and pergola beams but can leave gaps if you’re trying to wrap around an irregular patio shape. This is a system built for people who want to connect a hose and be done, not tinker with custom layouts. A common complaint in user reviews is minor dripping at the very first connection point, almost always traced back to skipping the Teflon tape step rather than a manufacturing defect.
Pros:
- ✅ All-brass nozzles hold up far better than plastic in direct sun
- ✅ 3/4-inch adapter fits standard hose bibs with zero extra parts
- ✅ Thousands of positive reviews back up real-world reliability
Cons:
- ❌ Fixed nozzle spacing limits creative or irregular layouts
- ❌ First-connection leaks are common without Teflon tape
At around $20-$30, HOMENOTE remains the safest first purchase for anyone testing whether misting is even right for their patio before investing further.
3. GMAULEE Misting Cooling System — best nozzle-to-dollar ratio in the budget tier
GMAULEE splits the difference between the ultra-compact mistcooling kit and the larger MIXC system, offering 33 feet of PU tubing and 10 brass nozzles with a single 3/4-inch brass connector. Here’s what to weigh: PU (polyurethane) tubing is generally more flexible in cold storage than the PVC blends some competitors use, which matters if you plan to coil and store the kit over winter rather than leaving it installed year-round.
The extra three nozzles compared to HOMENOTE let you cover an L-shaped patio corner or wrap a rectangular pergola more evenly, and the design explicitly markets itself around a five-minute install — a claim that mostly holds up according to aggregated review sentiment, provided your water pressure sits in the normal 40-80 PSI residential range. Reviewers frequently mention using it for secondary applications like trampoline cooling or greenhouse humidification, which speaks to the tubing’s versatility more than any single dedicated feature.
Pros:
- ✅ 10 brass nozzles cover more linear feet than similarly priced kits
- ✅ Flexible PU tubing survives winter coiling better than rigid PVC
- ✅ Genuinely simple installation for L-shaped or corner layouts
Cons:
- ❌ Still relies on standard hose pressure, so fine-mist quality varies
- ❌ Limited official troubleshooting support compared to bigger brands
Expect a price somewhere in the mid-$20s to low-$30s range, making this one of the better value plays if your patio is a touch larger than a compact balcony.
4. MIXC Misters for Outside Patio — best for large or wraparound patios
Once your patio, garden fence line, or pool deck stretches past what a 30-foot kit can handle, the MIXC system’s 75 feet of misting line and 23 nozzles becomes the more sensible choice. The spec comparison here is straightforward: nearly triple the nozzle count of the mid-tier kits means you can run a continuous perimeter around a large deck instead of concentrating mist in one corner.
Based on the spec sheet, MIXC pairs its longer line with a 3/4-inch brass adapter and reinforced fittings meant to handle the added back-pressure of a longer run — a detail that matters more than people expect, since longer misting lines lose pressure toward the far end if the fittings aren’t built for it. What most buyers overlook is that water pressure, not nozzle count, becomes the limiting factor at this scale; homes on well water or with older plumbing sometimes notice weaker mist at the last few nozzles.
Aggregated reviewer feedback consistently praises the even mist distribution across the full run when household pressure sits above 50 PSI, while properties with lower pressure report needing to cap a few nozzles to maintain output elsewhere.
Pros:
- ✅ 23 nozzles comfortably wrap large decks, pergolas, or fence lines
- ✅ Reinforced fittings manage the back-pressure of a 75-foot run
- ✅ T-joint compatibility supports creative, non-linear layouts
Cons:
- ❌ Homes with weak water pressure may see reduced mist at the far end
- ❌ Longer run means a longer, more involved initial installation
Typically found in the $30-$45 range, MIXC earns its slightly higher price through sheer coverage rather than premium materials — a fair trade if square footage is your priority.
5. Mid Pressure Misting Kit — 250 PSI — best entry point into pump-driven misting
This is where DIY patio misting system shopping crosses from “hose pressure” into genuine pump-driven territory, and the jump matters more than the PSI number suggests. At 250 PSI, the included pump roughly triples typical residential water pressure, which produces a noticeably finer, drier mist than any hose-only kit on this list.
Reviewers consistently report that the nickel-plated brass and stainless-steel nozzles resist mineral buildup better than the softer alloys found in bargain kits, and the built-in solenoid valve and internal filtration are genuinely uncommon at this price point — most competitors save those features for their premium tier. Here’s what to weigh: a pump introduces a new point of failure (and a new sound, however quiet) that hose-only systems simply don’t have, so buyers who want the absolute simplest install should stick with a standard-pressure kit instead.
On the other hand, if your patio sits in a humid climate where standard-pressure mist just makes everything damp instead of cool, this is often the smallest jump in cost that solves that exact problem.
Pros:
- ✅ 250 PSI produces noticeably finer mist than hose-pressure kits
- ✅ Nickel-plated brass and stainless nozzles resist mineral scaling
- ✅ Built-in filtration and solenoid valve rarely appear at this price
Cons:
- ❌ Pump adds a mechanical component that can eventually need replacement
- ❌ Setup is measurably more involved than a hose-only kit
Priced in the low-to-mid $100s range for the base 10-nozzle kit, this system rewards buyers willing to trade a bit of installation complexity for real mist quality.
6. Patio Misters Pro (1000 PSI) — best for large, covered patios wanting dry mist
At the top of the pressure spectrum, this system pairs 100 feet of tubing with 50 stainless-steel nozzles across four different orifice sizes, and that variety is the real headline. Based on the spec comparison, mixing 0.1mm, 0.15mm, 0.25mm, and 0.3mm orifices in one kit lets you fine-tune mist density zone by zone — smaller orifices for humid stretches of the patio, larger ones where you want a touch more cooling volume.
Reviewers consistently point to the sub-56-decibel pump as a standout; it’s quiet enough to run through a dinner party without becoming the topic of conversation, which is a real differentiator from cheaper high-pressure pumps that hum loudly enough to be heard over conversation. What the spec sheet won’t tell you, but aggregated review sentiment does, is that 1000 PSI systems perform best in dry climates — in the Southwest or high desert, evaporation happens fast enough that mist rarely reaches the skin as liquid.
In humid regions, expect some residual dampness on nearby furniture, which is a physics problem no misting system fully solves.
Pros:
- ✅ Four orifice sizes allow zone-by-zone mist customization
- ✅ Sub-56-decibel pump runs quietly enough for entertaining
- ✅ 100-foot line and 50 nozzles suit large or oddly shaped patios
Cons:
- ❌ Less effective in humid climates where mist doesn’t evaporate quickly
- ❌ Higher price point reflects the premium pump and nozzle count
Expect to pay in the $150-$250 range depending on current promotions, positioning this as a genuine investment piece rather than an impulse buy.
7. Smart Mist App-Controlled High Pressure System (1000 PSI) — best for tech-forward scheduling
The standout feature here isn’t the pressure rating, which matches the Patio Misters Pro system above — it’s the app control layered on top of a 70-foot stainless-steel tubing run and 35 nozzles rated for very hot, dry climates. Here’s what to weigh: scheduling your misting cycles from a phone means the system can start cooling the patio ten minutes before guests arrive or shut off automatically overnight, a convenience hose-only kits simply can’t replicate.
Based on the spec sheet, the stainless-steel tubing (rather than the UV-resistant plastic used in cheaper kits) is built for buyers who expect this system to stay outdoors permanently through multiple seasons rather than being coiled up each winter. Aggregated reviewer sentiment is largely positive about the app’s reliability, though a recurring theme is that firmware updates occasionally require re-pairing the app to the pump — a minor but real inconvenience worth knowing about before you commit.
For buyers who already run a smart-home ecosystem, this is the misting system that feels least like a garden hose accessory and most like a genuine outdoor appliance.
Pros:
- ✅ App-based scheduling and remote on/off control
- ✅ All stainless-steel tubing built for permanent outdoor installation
- ✅ 0.008-inch nozzles tuned specifically for hot, dry climates
Cons:
- ❌ Occasional app re-pairing needed after firmware updates
- ❌ Premium pricing reflects the smart-control hardware, not just misting performance
At the time of research this system lands in the $200-$300 range, making it the priciest option on this list — appropriate for buyers who value convenience and permanence over pure budget efficiency.
How to Install a Patio Misting Yourself: Step-by-Step Guide
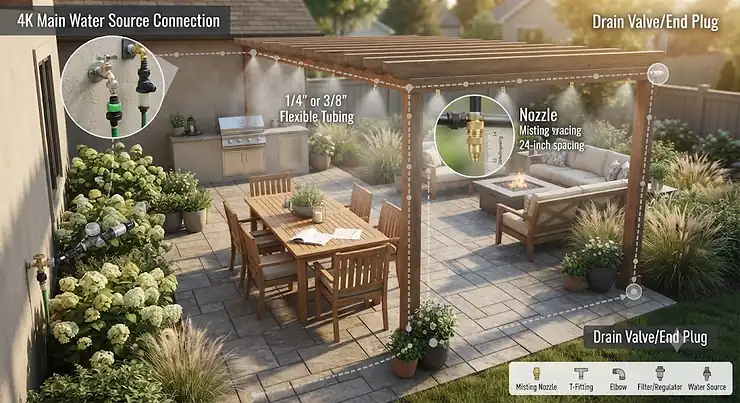
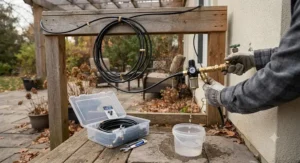
Installing a DIY patio misting system is genuinely one of the more forgiving home projects you can take on, and this installation guide tutorial applies to nearly every hose-pressure kit on this list. Start by mapping your patio’s shape on paper — corners, umbrella poles, pergola beams — before you cut a single piece of tubing, since a rushed layout is the single most common regret in aggregated reviews. Next, dry-fit the entire line without cutting anything, running it along your planned route with clips or zip ties loosely holding it in place, so you can spot problems before committing.
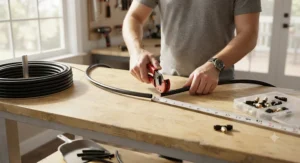
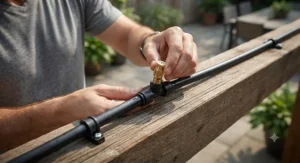
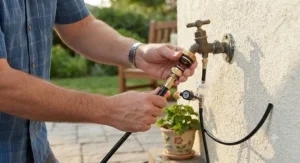
Once you’re satisfied with the layout, cut the tubing with a sharp tubing cutter rather than scissors; an angled or ragged cut is the leading cause of leaks at compression fittings, according to reviewer feedback across nearly every brand in this guide. Wrap the threaded spigot connection in two to three layers of Teflon tape before attaching the brass adapter — this single step eliminates the vast majority of first-connection drips that show up in negative reviews. Attach nozzles last, hand-tight only, then turn the water on slowly rather than all at once to let the line pressurize gradually and reveal any weak joints while the pressure is still low.
Within the first 30 days, the most common mistake is over-tightening plastic fittings in an attempt to stop a slow drip, which usually cracks the fitting instead of sealing it — a fresh wrap of Teflon tape almost always solves the same problem more safely. Budget fifteen to forty-five minutes total depending on kit size, and resist the urge to run the system at full pressure the very first time; a slow ramp-up protects both the tubing and your patience.
✨ Ready to gather your parts? Grab the components below and knock out your install this weekend!
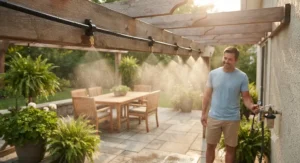
Real-World Scenarios: Matching a Self Install Misting System to Your Patio
Consider a college student renting a small apartment with a 6-by-8-foot balcony and no budget for anything elaborate. A compact kit like the mistcooling assembly or the HOMENOTE system fits this situation almost perfectly — low upfront cost, a self install misting system that takes fifteen minutes, and enough coverage for a single chair and small table without wasting nozzles on space that doesn’t exist.
Now picture a family with a 400-square-foot covered patio, frequent weekend barbecues, and kids who spend entire summer afternoons outside. Here, the calculus changes: the MIXC system’s 75 feet of tubing and 23 nozzles can wrap the patio perimeter and reach the play area, giving consistent cooling across a space large enough that a single small kit would leave half of it untouched. Budget-conscious but unwilling to compromise on coverage, this profile benefits most from prioritizing nozzle count and line length over premium pressure features.
Finally, imagine a homeowner in a dry, high-desert climate who entertains often and wants their patio to feel like a boutique hotel lounge. For this buyer, the investment in a 1000 PSI system — either the Patio Misters Pro or the app-controlled Smart Mist — pays off specifically because their climate allows the ultra-fine mist to evaporate before it ever dampens a chair cushion. The extra cost buys a genuinely different experience, not just marginally better cooling, which is the key distinction that should drive this particular purchase decision.
Common Problems and Solutions for Homemade Patio Misting
Homemade patio misting setups tend to run into the same handful of problems, and nearly all of them have simple fixes once you know what to look for.
Problem: Weak or uneven mist at the far end of a long line. This almost always traces back to household water pressure rather than a defective kit. Capping two or three of the farthest nozzles temporarily restores pressure to the rest of the line, and a pressure gauge attached to your spigot (sold separately for a few dollars) can confirm whether you’re dealing with a pressure issue before you blame the product.
Problem: Leaking at compression fittings. In the vast majority of cases, this comes down to an angled tubing cut rather than a manufacturing flaw. Re-cutting the tubing end squarely with a sharp tubing cutter and re-seating the fitting resolves this more often than replacing any part.
Problem: Nozzles clogging within weeks. Hard water is the usual culprit, since dissolved calcium and magnesium precipitate out as mineral scale inside small brass orifices. University of Florida Extension research on microirrigation systems notes that emitter plugging results from a mix of physical, biological, and chemical causes, with mineral scale being one of the most common chemical culprits in hard-water regions — the same principle applies directly to misting nozzles.
Problem: Mist feels damp instead of cooling. This is typically a climate mismatch rather than a product defect; standard-pressure kits and even mid-pressure pumps struggle to fully evaporate droplets in humid regions. Switching to smaller-orifice nozzles or a higher-pressure system can help, though physics ultimately limits how much any system can overcome high ambient humidity.
Problem: First-time installers second-guessing push-to-connect fittings. These fittings are designed to seat firmly with hand pressure alone; forcing them further with pliers is the most common cause of cracked connectors reported in reviews.
What Is a DIY Patio Misting System?
A DIY patio misting system is a self-installed network of tubing and nozzles that pushes water through tiny openings to create a fine mist, cooling outdoor air through evaporation rather than mechanical refrigeration. Homeowners connect it to a garden hose or a dedicated pump, then mount the line along a patio, pergola, or umbrella frame.
The science behind that cooling effect is well documented outside the marketing world, too. According to a Department of Energy-funded resource guide on evaporative cooling from Pacific Northwest National Laboratory, evaporative systems work best in dry climates where outdoor relative humidity stays low during the cooling season, which explains why the same misting kit can feel refreshing in Arizona and slightly damp in Florida.
Required Components of a DIY Patio Misting Kit
Every DIY patio misting kit, regardless of price tier, is built from the same core parts, and understanding them makes troubleshooting and upgrades far less intimidating.
- Tubing (the misting line): Usually 1/4-inch UV-resistant PVC or polyurethane, this carries water from your spigot to each nozzle. Length determines your maximum coverage area.
- Nozzles: Brass or stainless-steel tips with a tiny orifice (measured in millimeters or inches) that atomize water into mist. Orifice size directly controls mist fineness — smaller openings produce a drier mist but need higher pressure to avoid dripping.
- Adapter/connector: Typically a 3/4-inch brass fitting that threads onto a standard hose bib, letting the misting line tap into your existing water supply without plumbing modifications.
- Fittings (tees, elbows, end caps): These let you turn corners, branch the line in multiple directions, and seal off the far end of the run.
- Filter (on higher-end kits): An inline filter screens out sediment before it reaches the nozzles, extending their working life significantly, especially in areas with well water or older municipal lines.
- Pump (optional, mid-to-high-pressure systems only): Boosts water pressure well beyond standard residential levels, producing the ultra-fine “dry mist” associated with premium systems.
How to Choose a DIY Patio Misting System
- Measure your patio first. Walk the perimeter and estimate square footage before shopping — this single step prevents both under-buying (a kit too small to cover your space) and over-buying (paying for nozzles you’ll never use).
- Check your water pressure. Most homes sit between 40 and 80 PSI, which is enough for any standard hose-pressure kit; if you’re consistently below 40 PSI, factor a pump-driven system into your budget from the start.
- Match nozzle count to line length. A rough rule of thumb is one nozzle every 2 to 3 feet — fewer nozzles on a long line create gaps in coverage, while too many can overwhelm your water pressure.
- Consider your climate. Dry climates get more from high-pressure, fine-orifice systems, while humid regions often do just as well with a mid-range standard-pressure kit.
- Decide between brass and stainless steel. Brass resists corrosion well and costs less; stainless steel resists mineral scaling slightly better and suits buyers planning a permanent, multi-year installation.
- Factor in your DIY comfort level. If you’ve never assembled anything with compression fittings, a pre-assembled kit like HOMENOTE removes guesswork; if you want a fully custom layout, a build-your-own kit like mistcooling gives you that control.
- Set a realistic budget including accessories. Teflon tape, a tubing cutter, and mounting clips rarely come included but usually cost under $15 combined — build that into your total before comparing sticker prices.
DIY Misting Kit vs Professional Installation: Cost Comparison
| Factor | DIY Misting Kit | Professional Installation |
|---|---|---|
| Upfront Cost | Around $25–$300 depending on tier | Often starts in the $150 range and climbs with system size |
| Installation Time | 15 minutes to a few hours | Scheduled appointment, often days out |
| Customization | High — you design the exact layout | Moderate — limited by installer’s standard packages |
| Maintenance | DIY — you handle descaling and leak repairs | May include a service plan, at added cost |
| Best For | Budget-conscious homeowners comfortable with basic tools | Buyers wanting a hands-off, warrantied installation |
The analysis here is straightforward: a DIY patio misting system almost always wins on upfront cost and installation speed, while professional installation wins on convenience and warranty coverage. For most residential patios under 1,000 square feet, the DIY route delivers comparable cooling performance at a fraction of the price, provided you’re willing to spend an afternoon with a tubing cutter and some Teflon tape.
Long-Term Cost & Maintenance
The real cost-saving DIY advantage of a misting system shows up over years, not just at checkout. A $30 hose-pressure kit that lasts three summers works out to roughly $10 per cooling season, before accounting for the fact that you supply your own water rather than paying for a separate cooling utility bill increase the way central air conditioning demands. Even premium 1000 PSI systems, which draw a small amount of electricity to run their pumps, use dramatically less energy than running a window air conditioner for the same hours, since evaporative cooling exploits water’s natural phase-change properties instead of mechanical refrigeration.
Maintenance costs stay modest if you stay ahead of them. Budget for an occasional nozzle soak in a mild vinegar solution every one to two months in hard-water regions, replacement of a cracked fitting here and there (often under $2 each), and a full tubing replacement roughly every three to five years depending on UV exposure and climate. Buyers in humid, low-sun climates often see tubing last considerably longer, since UV degradation — not general wear — is the main driver of tubing brittleness over time.
Safety and Regulations Guide for Home Misting Systems
Misting systems are low-risk compared to most home improvement projects, but a few practical precautions matter. Always shut off and drain the water supply before disconnecting or modifying any part of the line, and never leave a pressurized pump-driven system running unattended for extended periods. Keep tubing and nozzles positioned away from walking paths where wet surfaces could create a slip hazard, particularly on tile or sealed concrete patios.
Extreme heat itself remains a genuine health risk that a misting system helps mitigate but doesn’t eliminate entirely. The CDC notes that people should still limit strenuous outdoor activity during the hottest parts of the day and watch for signs of heat-related illness even with cooling measures like fans or misters in place, since a mister lowers ambient temperature but doesn’t replace hydration or shade breaks during genuinely dangerous heat. If you or someone nearby shows confusion, dizziness, or a rapid pulse during hot weather, treat it as a medical concern regardless of what cooling equipment is running.
✨ Don’t Miss These Exclusive Deals!
🔍 Take your outdoor cooling setup to the next level with these carefully selected kits. Click on any highlighted product to check current pricing and availability. These systems can help you create a genuinely refreshing summer patio your whole family will enjoy!
Frequently Asked Questions
❓ How much does a DIY patio misting system cost?
❓ Do misting systems work in humid climates?
❓ Can I install a misting system myself without plumbing experience?
❓ How often do misting nozzles need cleaning?
❓ Do I need a pump for a patio misting system?
Conclusion
Choosing among these seven DIY patio misting system options really comes down to matching scale and climate to your specific patio rather than chasing the highest nozzle count on the shelf. A small balcony or reading nook rarely needs more than the compact mistcooling or HOMENOTE kits, while a sprawling backyard deck benefits from the coverage of the MIXC system or the fine-tuned pressure of the Patio Misters Pro and Smart Mist units. What ties every honest recommendation together is this: brass or stainless nozzles consistently outlast plastic, Teflon tape solves more leaks than any warranty claim, and a realistic read on your local humidity will tell you more about expected performance than any marketing claim ever could. Whichever tier fits your budget, a properly installed misting system can genuinely reclaim your patio from the worst weeks of summer heat — and do it for a fraction of what a built-in cooling system would cost.
Recommended for You
- 7 Best Restaurant Patio Misting Systems That Actually Work in 2026
- Portable Misting Fan: 7 Top Picks for Cooler Summers in 2026
- Low Pressure Misting Kit: 7 Best Picks & DIY Guide for 2026
Disclaimer: This article contains affiliate links. As an Amazon Associate, I earn from qualifying purchases. If you purchase products through these links, we may earn a small commission at no additional cost to you.
✨ Found this helpful? Share it with your friends! 💬🤗
